microgreens
Hydroponic Strawberries – Grow Amazing Strawberries At Home
DIY: How to Grow Hydroponic Strawberries in Your Home Garden
The Basics of Hydroponic Strawberries: What You Need to Know
Hydroponic strawberries are grown without soil, using a nutrient-rich water solution instead. This innovative technique allows for year-round cultivating and results in larger, often sweeter, strawberries. Essential elements to start include hydroponic systems, nutrient solutions, proper lighting, temperature control, and of course, strawberry plants. Good aeration is vital to prevent root diseases. Regular monitoring of pH levels in the water ensures the plants receive all necessary nutrients. Hydroponic strawberries require constant attention and care, but the fruits of your labor can be significantly rewarding. Several options exist on the market that will provide you a quality hydroponic strawberry planter system.

Strawberries Variety: Which Is Best for Hydroponic System?
The best variety of strawberries for a hydroponic system is typically the day-neutral type, such as the ‘Everbearing’ variety. This type of strawberry produces a consistent yield all year round, making it very suitable for hydroponic cultivation. The ‘Everbearing’ strawberry is a durable plant that is highly resistant to diseases, enhancing its viability in a water-based environment. Its yield is characterized by medium to large-sized berries with an intensely sweet taste. Therefore, for a successful hydroponic cultivation of strawberries, the ‘Everbearing’ variety is highly recommended.
What Do You Need to Grow Hydroponic Strawberries?
Growing hydroponic strawberries requires some specific conditions and materials for optimal results. Firstly, you will need a hydroponic system. The most suitable options for strawberries are the Nutrient Film Technique (NFT) system, drip system, or the ebb and flow system. Secondly, you will need a well-balanced, water-soluble nutrient solution. This solution will substitute for the nutrients usually gained from soil and must contain essential macro and microelements like nitrogen, phosphorous, potassium, magnesium, iron, and calcium. Grow lights will be required if you are growing your strawberries indoors or in a place without sufficient natural light. Acceptable temperature and humidity levels are also important, ideally 60-80 degrees Fahrenheit and a relative humidity of 50-70%. Lastly, proper pH levels must be maintained; strawberries do best with a pH of 5.8 to 6.2. Regular monitoring and adjustments will also be essential for successful strawberry growth.
Benefits of Growing Strawberries Hydroponically
Growing strawberries hydroponically, which means cultivating them in water instead of soil, presents numerous benefits over traditional gardening methods. Firstly, hydroponics is a space-effective method for those who want to grow plants, permitting a higher yield per square meter since hydroponic plants can be grown close to each other. Another advantage is the significant reduction in pests and diseases, as the soilless medium eliminates the majority of soil-borne issues. Hydroponically grown strawberries also generally claim a faster growth rate due to the development of smaller root systems, which lead to quicker nutrient absorption and thus, hastens the fruiting process. The hydroponic culturing technique allows for precise control of nutrient delivery to the plants, leading to healthier, larger, and juicier fruit outputs. Additionally, year-round cultivation is achievable as growing is not reliant on seasonal changes. These aspects not only make this method ideal for home gardeners aiming for consistent and efficient cultivation but also offer significant potential for commercial growth.
Setting Up Your Hydroponic System for Strawberries
Setting up a hydroponic system for strawberries involves initial planning and appropriate materials. Clear a space for a hydroponic strawberry planter, ensuring it receives adequate sunlight. Purchase a system kit from a reputable supplier, ideally suited for strawberries. You’ll need nutrient solutions, grow lights and an air pump. Strawberries need a lower pH, ideally between 5.5 and 6.2. Once the system is fully set up, regularly monitor pH levels, nutrient application, temperature, and overall plant health.
Choosing The Best Hydroponic System for Strawberries
Choosing the best hydroponic system for strawberries largely depends on your individual needs and available space. Strawberries thrive in various hydroponic systems, including the NFT (Nutrient Film Technique), DWC (Deep Water Culture), and the Ebb and Flow system. While the NFT system ensures fresh nutrients supply constantly, DWC allows plants to absorb nutrients directly from the water. Conversely, the Ebb and Flow system mimics natural rain conditions. Factors such as available budget, ease of maintenance, space availability, and personal preference should guide your decision-making process. Always remember to maintain pH levels, temperature, and light for robust strawberry growth.
The Importance of Grow Lighting in Hydroponic Growing
Grow lighting plays an indispensable role in hydroponic farming, a cutting-edge agricultural technique. Since Hydroponics substitutes soil with a nutrient-rich water solution, the role of sunlight, crucial for photosynthesis, is taken up by grow lights. These artificial sources of light mimic the solar spectrum, providing the necessary illumination for plant growth. The intensity and spectrum of grow lights can be adjusted to suit different plant species, thereby promoting maximum growth and yield. Hence, grow lighting is vital in hydroponics as it creates an optimal environment for plants to thrive, making year-round cultivation and high crop productivity possible.
How To Set Up Your Hydroponic Garden
Setting up a hydroponic garden may sound complex, but the process is relatively straightforward once you understand the basics. Start by choosing a suitable location for your garden; this could be anywhere from your basement, your garage, or even on your rooftop. The location should have a controlled temperature and access to ample sunlight or artificial light. Next, choose the type of hydroponic system best for your needs; popular options include deep water culture, wick, nutrient film technique, and ebb and flow systems. After determining your system, you need to choose suitable plants for hydroponic cultivation. Lettuce, cucumbers, and tomatoes are often good choices for beginners. Purchase a specialized hydroponic nutrient solution for the plants, as standard soil fertilizers won’t work in this type of setup. The last step is to monitor the pH level of your solution regularly. Ideal pH values will change depending on the type of plant, but usually fall between 5.5 and 6.5.
Generating the Correct Hydroponic Nutrient Solution
Generating the correct hydroponic nutrient solution is key to the success of any hydroponic garden. This process involves precise mixing of water with the right quantity of essential minerals such as nitrogen, calcium, magnesium, phosphorous, potassium, sulfur and trace elements. These nutrients, typically absent in normal soil, are crucial for plant growth and development. It is important to consider the specific nutritional needs of different plants and tailor the solution accordingly. Ensuring the correct pH level, typically between 5.5 to 6.5, is also essential as it affects nutrient availability. Failure to generate the correct hydroponic nutrient solution can result in poor plant health and decreased productivity.
The Right Growing Media for Hydroponic Strawberries
Choosing the right growing media for hydroponic strawberries is vital for a successful crop. Strawberries prefer a well-draining medium, making perlite, coco coir, and rockwool popular choices among hydroponic growers. Perlite is lightweight and facilitates good aeration, while coco coir retains moisture, ensuring consistent hydration. Rockwool, on the other hand, provides excellent water and nutrient retention. Whichever medium is chosen, it’s essential that it supports the plant’s root system, provides adequate aeration, and allows for optimal nutrient uptake.
Planting And Growing Hydroponic Strawberries
Hydroponic strawberries are grown in a nutrient-rich solution, instead of soil, allowing for year-round cultivation in a controlled environment. The method utilizes a water-based system enriched with essential minerals that directly feed the plants’ roots, promoting faster growth and higher yields. Strawberries grown hydroponically are often of superior quality, being sweeter and larger. It’s also a more sustainable farming practice as it requires less water, space, and reduces the risk of disease and pests. With a hydroponic drip system, careful monitoring of the pH and nutrient levels is a crucial way to ensure optimal growth.
Transplanting Your Strawberry Plants into the Hydroponic System
Transplanting your strawberry plants into a hydroponic system can be a great way to boost their growth and yield. Start by carefully uprooting the strawberries from their original soil bed, ensuring their roots are kept intact as much as possible. Rinse the soil off the roots under a gentle stream of lukewarm water, taking care not to damage the roots. Once the roots are clean, place the strawberry plant into its new hydroponic container. Each plant should be given enough space with sufficient lighting to grow without hindrance. Add your nutrient solution, ensuring it reaches the root system of every plant adequately. Periodically check the pH levels of the solution to maintain an optimum balance. With the right setup and proper care, transplanting strawberries into a hydroponic system can result in healthier and bountiful crops in a cleaner, space-saving environment.
Growing Hydroponically: Care and Maintenance for Strawberries
Hydroponic strawberry growing involves cultivating strawberries in water-rich solutions instead of soil, which aid in nutrient uptake. Perfect care and maintenance for hydroponic strawberries involves maintaining steady pH levels, between 5.8 to 6.2, for the smooth flow of nutrients. Regular addition of balanced nutrients, in precise amounts, is also crucial for optimal growth. Air and water temperatures should be regulated within 65-75°F and 65-68°F respectively, while ensuring ample exposure to light for adequate photosynthesis. Cleaning the system periodically prevents disease prevalence. While maintaining hydroponic systems indeed require diligence, the result is bountiful, healthy strawberries, subtly sweet and wholly rewarding.
Understanding the Needs of Hydroponically Grown Strawberries
Understanding the needs of hydroponically grown strawberries is essential for optimal growth and yield. Through this method, strawberries are grown without soil, instead they receive nutrients directly from water. The primary needs include maintaining appropriate levels of pH, electrical conductivity, oxygen, nutrients, and light. It’s important to monitor and adjust these parameters regularly to prevent deficiencies that affect growth. Moreover, factors like temperature, humidity, and pests must be managed properly. A good understanding of these needs is key for successful hydroponic strawberry farming.
Indoor Growing: Ensuring Good Growth and Harvest Year-Round
Indoor growing, also known as urban farming or indoor gardening, has risen in popularity, especially among people living in urban areas with limited outdoor space. By growing crops inside, whether in a small apartment, suburban home, or an indoor commercial facility, you can ensure good growth and harvest year-round regardless of the outdoor weather conditions. This constant cultivation does not merely produce fresh, healthy, homegrown vegetables, fruits, and herbs throughout the year; it also enables you to control the growing environment fully, allowing for meticulous monitoring of lighting, temperature, and moisture levels. This optimal environment, paired with the absence of common outdoor pests and diseases, often results in higher yields and faster growth than traditional outdoor farming. Hydroponics, aeroponics, and aquaponics are some of the techniques utilized for indoor growing, further maximizing space and reducing the use of soil, making indoor cultivation an eco-friendly and sustainable option. By embracing indoor growing, you can ensure constant access to fresh, organic, and pesticide-free produce, significantly reducing the dependence on seasonality or imported goods. Thus, indoor growing enables a good growth and ensures harvest all year round, stepping towards food security and sustainability.
Troubleshooting Issues in Your Hydroponic Strawberry Garden
Drawbacks of Growing Strawberries Hydroponically
Despite the advantages, growing strawberries hydroponically also has its drawbacks. The initial setup of the hydroponic system can be expensive and requires a learning curve to maintain optimal conditions. Additionally, the plants are at a higher risk of disease due to the water-centric environment, and poor water quality could quickly harm or even kill the strawberries. Also, hydroponically grown strawberries may not have the same natural taste as those grown in soil.
How to Spot Nutrient Deficiencies in Hydroponic Strawberries
To spot nutrient deficiencies in hydroponic strawberries, carefully observe the color, size, and general health of the plant. Yellowing leaves may indicate iron deficiency, while stunted growth can signal a lack of nitrogen. Irregular or slow fruit development could be due to insufficient phosphorus. Brown leaf edges could signify potassium deficiency. Conducting regular checks on led grow lights and adjusting nutrient mixes in your grow tray can prevent deficiencies, ensuring successful growth of your hydroponic strawberries.
How to Pollinate Your Strawberries in an Indoor Growing Setting
Indoor strawberry cultivation enables the control of environmental elements, which is often beneficial. However, one important factor that must be addressed is pollination, as bees, wind, or other natural pollinators may not be accessible indoors. Strawberries are self-fertile, meaning they don’t require pollination from other plants, however, some assistance will enhance the yield. You may manually pollinate indoor strawberries by using a small, soft-bristled brush or a cotton-swab. Gently dab the brush or cotton-swab into each flower, touching each stamen and pistil delicately to mimic the role of a bee or the wind. This process allows the pollen to transfer from the stamen to the pistil, necessary for fruit development. The procedure must be repeated every couple of days during the flowering period. Remember, even though manual pollination may seem tedious, it reveals a rewarding, bountiful harvest of indoor-grown, sweet strawberries.
Strawberry Diseases and Pests: Prevention and Treatment
Strawberry plants are susceptible to several diseases and pests, notably fungi like verticillium wilt, powdery mildew, and root rot, along with pests such as spider mites, slugs, and strawberry bud weevils. Prevention techniques include proper spacing and rotation of plants to avoid build-up of disease organisms, using disease-resistant varieties, and maintaining a clean and weed-free garden to deter pests. Utilize organic mulch to retain soil moisture and suppress weed growth, hence lowering the risk of pests and diseases. Regular inspection of plants for signs of disease or pest activity is critical to early detection and curative measures. Treatment methods for diseases usually involve the use of fungicides, while controlling pests in hydroponic strawberry plants frequently requires the use of pesticides in the hydroponic drip system. However, apply these chemicals responsibly and in line with approved protocols to safeguard beneficial pollinators and the overall ecological balance. In serious cases, consider professional pest control services for effective treatment.
Harvesting and Enjoying Your Hydroponic Strawberries
When and How to Harvest Strawberries in a Hydroponic System
Strawberries grown in a hydroponic system often produce fruit faster compared to traditional soil gardening, allowing for harvesting generally 4-6 weeks after planting. The key to when you should pick your hydroponic strawberries is the color. To ensure the best taste, strawberries should be harvested when at least three-fourths of the berry is red. The most desirable time to pluck them is usually in the early morning when the temperature is low.
For how to harvest, it is best to hold the stem between your thumb and forefinger, then gently twist and pull the fruit. Ensure you leave a small portion of the stem on each fruit to prevent any damage or bruising. Any remaining flowers or green strawberries should be left on the plant to allowed continued growth. It should be noted that ripe strawberries do not shelf well so plan your harvest when you are ready to consume them. Consequently, harvesting strawberries from a hydroponic system can yield sweeter and more flavorful fruit, given they are plucked at the right color and time.
Do Hydroponic Strawberries Taste Different?
Growing strawberries hydroponically changes the taste profile compared to traditional soil-grown strawberries, often resulting in a more rich and intense flavor. Hydroponics can control the nutrients, water, and light each plant receives, resulting in strawberries that are larger and more delicious. However, some people argue that hydroponic strawberries might lack the subtle earthy flavor natural to soil-grown strawberries, making their taste slightly different. A well-cared-for hydroponic grow tray system with led grow lights also allows for growth year-round, which can influence the flavor as the hydroponic strawberries do not undergo seasonal changes. Consequently, while hydroponic strawberries are consistent, their taste can differ from their soil-grown counterparts.
The Impact of Growing Strawberries Hydroponically on Their Nutritional Value
The method of cultivating strawberries hydroponically, which involves growing plants without soil and instead using mineral nutrient solutions in a water solvent, has shown to be influential in the nutritional value of the fruit. Hydroponic cultivation can result in strawberries enriched with higher quantities of Vitamin C and antioxidants. This enhancement is due to the controlled environment in which hydroponically grown strawberries exist, allowing for optimal nutrient absorption. The absence of soil eliminates the chances for soil-borne pathogens, thereby decreasing the use of pesticides and increasing the overall fruit’s safety for consumption. Furthermore, the ability to modify the nutrient solution in a hydroponic drip system provides a means to enhance the plant’s nutrient uptake, positively affecting the nutritional profile of the strawberries you want to grow. Thus, hydroponics offers a promising pathway for the production of nutritionally enhanced strawberries.
3×3 Grow Tent – Optimizing Autoflower Yield with Cannabis Plants
How to Grow Cannabis in a 3×3 Grow Tent?
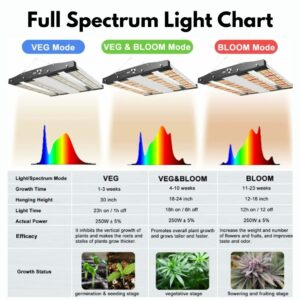
Growing cannabis in a 3×3 grow tent requires a few key steps. Firstly, for your grow space, ensure adequate lighting, as cannabis needs lots of light to grow, ideally around 500-600W per plant. Secondly, maintain temperature and humidity, with ideal conditions being 70-85°F and 40-70% humidity. Controlling ventilation is also important as fresh air promotes better yields. Lastly, choose the proper strain for your tent size; in a 3×3 tent, you can grow about 1-4 plants depending on the strain. Remember to monitor your grow tent regularly to ensure optimal conditions for your autoflowering cannabis plants and promote overall plant health.

Mars Hydro FC-E 3000 3×3 Grow Tent Kit – CHECK PRICE HERE
Optimizing Your 3×3 Tent for Maximum Yield
Optimizing your 3×3 tent for maximum yield involves several factors including the right lighting, proper nutrition, and ideal planting techniques. For lighting, a 600W MH/HPS grow light is recommended for a 3×3 space. This results in not only better photosynthesis, but also more intense flavor and denser buds. Implement a feeding regimen for your autoflowering cannabis that includes nutrients rich in nitrogen, phosphorus, and potassium while also maintaining optimal pH levels in your indoor grow. During the growth phase in your grow room, practice low-stress training (LST) techniques such as topping to promote higher yields. By carefully manipulating your plants, you allow even light distribution and increase their exposure to carbon dioxide. With these indoor grow measures, your autoflowering cannabis crop can thrive in the gorilla grow tent, ensuring a significant increase in yield.
Monitoring temperature and humidity levels is also crucial. Optimal temperatures range between 70-85 degrees Fahrenheit during the day and 20 degrees cooler at night. Maintain relative humidity levels between 40-60% during the growth phase, and lower this down to about 40% during the flowering stage.
Seed selection also plays an essential role in your yield. Choose seeds from breeders known for quality, and consider the space you have to work with. Some strains of autoflowering cannabis are great for maximizing small spaces, so choose accordingly, making sure they are able to fit in your indoor grow space.
Proper timing of the harvest is crucial as well. The ideal time to harvest is when 60-70% of the pistils have darkened. This not only helps ensure the highest yield but also contributes to the overall potency of the buds.
Control pests effectively to ensure they don’t affect your yield. Predatory insects, organic sprays, and cleanliness can help control pests in your indoor tent.
Having a CO2 system can also increase your yield significantly. Plants breathe CO2 and produce oxygen, so a high level of CO2 can result in faster-growing plants and enlarged buds.
Lastly, remember every aspect/supply for growing, such as adequate watering, right soil, and good air circulation plays its role in maximizing the yield.
Therefore, simply follow these best growing practices to improve your cannabis yield in a 3×3 grow tent. These methods take time, effort, and patience, but the end result will be worth it.
What Determines Plant Size In Nature?
The size of a plant in nature is determined by a complex interplay of both environmental and genetic factors. Environmental conditions such as the quality of soil, availability of water, exposure to sunlight, climatic factors like temperature and humidity, and competition for resources with other plants significantly influence plant growth. For instance, nutrient-rich soils and sufficient water supply generally correspond with larger plant sizes. Similarly, genetic factors inherent to the plant species also play a role in determining size, as they dictate the plant’s growth potential. Therefore, both the plant’s genetic makeup and its environment largely determine its size in nature.
What Determines Plant Size Indoors?
Multiple factors contribute to the size of indoor plants. Paramount among them for many plants to grow is the size of the pot per plant. The larger the pot in the grow space, the more room the roots have to expand and hence, the more autoflowers the plant can produce. Apart from this, the variety or species of the autoflowering cannabis plant also determines its size in your indoor grow space. Some autoflowering cannabis plants are naturally predisposed to grow larger than others, but remember that in an indoor grow they need to be able to fit within your space. In a grow room, other factors include the amount of light, water, and nutrients each plant receives, especially when growing many plants. Ideal growing conditions can enhance the plant’s growth, but poor conditions can inhibit it. Therefore, understanding and providing the proper care is essential in determining the size of indoor plants.
Moreover, training and pruning techniques also play an important role in controlling the size of the indoor plants. These methods help shape the plant’s growth pattern, making them more manageable and render efficient use of space and light.
The presence of pests and diseases can also affect the size of the plant. Unchecked pests and diseases can stunt the growth, causing the plant to halt its development or even die. Thus, regular inspection and treatment are necessary to ensure a healthy growth.
Temperature and humidity levels within the grow room are other crucial factors that can impact plant size. Different plants have diverse temperature and moisture needs; if these requirements are not met, it can lead to slow growth or dwarfing. Also, ignoring the pH level of the soil or hydroponic solution can also adversely affect plant growth due to nutrient lockout issues.
Lastly, the genetics of the plant drastically influence the maximum size. Just like humans, each strain of plant has its own set of genetics which determines its potential growth. Thus, even in ideal conditions, a plant can only grow as big as its genetics will allow.
With all these factors in play, growing indoor plants is quite a balancing act. Careful management of all these variables will help in achieving the maximum growth potential of your indoor plants.
Genetics Factors in Cannabis Plants
Genetic factors play a crucial role in the overall growth, potency, and adaptability of autoflowering cannabis plants in different light spectrums found in the gorilla grow tent. The inherent genetic constitution of a cannabis plant determines many aspects, such as the concentration of cannabinoids like THC and CBD, which dictate the psychoactive effects. Additionally, the plant’s genetics also influence its size, yield, and resistance to pests and diseases. Breeding and crossbreeding of strains can manipulate these traits, allowing growers to enhance specific characteristics that align with their needs. Ultimately, a profound understanding of the genetics of autoflowering cannabis plants is vital for effective cultivation in your indoor grow and consistent product quality.
Pot Size Considerations
When choosing pots for many plants to grow, consider the size of the pot per plant. The pot size plays a vital role in determining the growth rate and overall health of the 5 plants you want to grow per square meter, especially when utilizing the sea of green technique in your gorilla grow tent. If the pot is too small, the roots of the auto-flowering cannabis plants you want to grow may become overcrowded, leading to stunted growth. However, a pot that is too large can retain excess moisture, which can cause root rot. Therefore, it’s crucial to select a pot that is appropriate for the specific plant you’re planning to grow. Also, one should consider the growth rate and maturity size of the plant when planning on how many plants per square foot to grow. For optimal growth, a pot should provide ample space for root development without being overly spacious.
Use the Right Lighting Panels
Using the right lighting panels is paramount for creating an optimal lighting environment in various settings such as offices, homes, hospitals, and schools. Lighting panels in a grow room are not just about illuminating space but providing a suitable and comfortable environment for every possible activity, including the sea of green technique. They are classified into different types, including LED flat panels, troffers, and edge-lite, each of which possesses distinct unique features. It’s important to choose the lighting panel with an apt light spectrum that best fits your gorilla grow tent’s requirements and personal preferences. For instance, LED flat panels offer energy efficiency and longevity, while edge-lite panels are ideal for installation in areas with limited space. The proper selection of lighting panels with the correct light spectrum will contribute to improved visual comfort and better energy consumption in your indoor grow space. Finally, while making your choice, consider factors like panel size, power rating, color temperature, and installation methods to ensure you get the most from your lighting panel.
Ensure Proper Ventilation
Ensuring proper ventilation is a crucial aspect when it comes to maintaining a healthy environment for autoflowers in a grow room. Adequate ventilation not only enhances the overall air quality by reducing pollutants and improving its freshness, but also prevents the build-up of harmful elements like mold or mildew which can adversely impact health. It implies the expulsion of stale air from your indoor grow space, and the replenishment with fresh, clean air from outside, enhancing your autoflowering cannabis plants’ health. This can be achieved in your grow space by employing methods such as the use of exhaust fans, air vents and allowing fresh air to circulate through open windows or doors. It is of utmost importance in areas where chemicals are used or where people spend a significant amount of time, such as workspaces, kitchens or bathrooms. Therefore, an appropriate ventilation system is a fundamental component to securing the well-being of people in any indoor setting.
Use the Right Growing Technique
Choosing the right growing technique for your autoflowering cannabis plants is critical to the success of your indoor grow garden or farm. The number of plants you choose can make the difference between a bountiful harvest and disappointing growth. The right method can maximize productivity, reduce plant disease, conserve water, and optimize nutrient use. Techniques such as crop rotation, organic farming, or hydroponics are all beneficial, depending on your specific needs. Crop rotation, for example, helps deliver various nutrients to the soil, while organic farming promotes biodiversity through the use of natural, non-toxic methods. Hydroponics, on the other hand, facilitates growth in small grow spaces and reduces water usage per plant. Each of these techniques serves a unique purpose and should be chosen based on the type of garden, climate, soil, and available resources. Hence, understanding and implementing the right growing technique is a significant determinant of your garden’s health and productivity.
Summary: How to Grow Cannabis in a 3×3 Grow Tent?
Growing cannabis in a 3×3 grow tent involves several crucial steps that need to be meticulously adhered to to achieve high-quality results. The first step is choosing the right strain of cannabis, based on personal preferences and specifications of growth. The chosen seeds should be germinated for 24-48 hours before being transplanted into small pots filled with fertile soil. Your grow tent should be equipped with high-quality LED grow lights, an exhaust fan for proper ventilation, and a temperature & humidity monitor. To ensure their health per plant, you’ll need to water your cannabis plants regularly while maintaining correct pH levels in the water nutrient solution. Pruning and trimming the plants contribute to an efficient growth system, as does rotating the pots, ensuring each plant receives adequate light exposure. Temperature, humidity, and light duration should be regulated carefully to avoid inducing stress on the plants. It typically takes around 8-10 weeks for the autoflowers to mature enough for harvesting. With the correct balance of all elements, your small gorilla grow tent can produce a hearty yield of fast buds from the autoflowering cannabis plants.
Light Spectrum Chart Interpretation: A Guide for Indoor Grow Light Projects
Light Spectrum and Plant Growth
The light spectrum significantly affects plant growth, specifically through photosynthesis – the process plants use to convert light energy into chemical energy. Different colors of light, dictated by their varying wavelengths, contribute diverse elements to plant health. Blue light encourages leafy growth and aids in photosynthesis, while red light promotes flowering and fruit production. Green light is majorly reflected back which is why plants appear green. However, it is important to note that plants ideally need a balance of light across the spectrum for optimal growth. Our understanding of how plants use light for photosynthesis has led to the development of specialized, spectrum-tailored LED lights for indoor gardening. Such innovations enhance plant growth by offering a more controlled light environment.
What is the Grow Light Spectrum?
The Grow Light Spectrum refers to the range of light wavelengths that plants receive to carry out photosynthesis, their essential process of converting light into chemical energy. This spectrum is composed of different colors, each with distinct properties and effects on plant growth. The spectrum’s main components are ultraviolet, blue, green, red, and far-red light. Ultraviolet light, while less utilized in photosynthesis, aids in creating stronger, more resistant plants. Blue light is instrumental in regulating plant growth, promoting strong roots, and enhancing overall health. Green light is often overlooked due to its less direct role in photosynthesis but is crucial in penetrating deeper into plant tissues and canopies in combination with blue and red lights. Red light stimulates flowering and fruiting stages, boosting yields. Finally, far-red light signals plants to undergo adaptive changes, like elongation, to compete for orange light and other parts of the full spectrum lighting.
Artificial grow lights aim to mimic this natural light spectrum to optimize indoor plant growth and development. Some lights cover the full spectrum, while others target specific wavelengths to promote certain growth stages or traits. The advances in grow lighting technology, particularly Light Emitting Diodes (LEDs), have made it possible to customize the light spectrum to the specific needs of different plant species. Choosing the right spectrum is pivotal in maximizing the productivity and efficiency of indoor hydroponic or gardening systems. Understanding the Grow Light Spectrum is, thus, vital to nurture plants effectively in controlled environments where natural sunlight isn’t available.
What is a Grow Light Spectrum Chart and why is it important?
A Grow Light Spectrum Chart is a visual tool used to analyze the light spectrum emitted by grow lights, which are used for indoor or greenhouse horticulture. This chart details the different color wavelengths that the given grow light can produce. Each color corresponds to a specific wavelength measured in nanometers, and certain color wavelengths are more beneficial for plant growth than others. For instance, red and blue light spectrums are crucial for photosynthesis. The importance of this chart lies in optimizing plant health and productivity. Growers use this information to select the most appropriate grow lights, ensuring their plants receive the correct spectrum for specific growth stages and types of plants. Thus, a Grow Light Spectrum Chart is pivotal in indoor gardening or farming scenarios, aiding in the effective nurturing and successful growth of plants.
Defining the Spectrum in Grow Light Spectrum
The Grow Light Spectrum is a critical component in indoor gardening and hydroponics. It refers to the range of light wavelengths that are required for plants to perform photosynthesis effectively. This spectrum includes several segments like ultraviolet (UV) light, visible light, and infrared (IR) light, each providing unique benefits for plant growth. UV light, for instance, promotes plant strength and disease resistance. Visible light, comprised of blue, green, and red light, plays crucial roles in plant development and flowering, while IR light induces flowering and fruiting. Understanding and implementing the right mix of the grow light spectrum can enhance overall plant health and productivity.
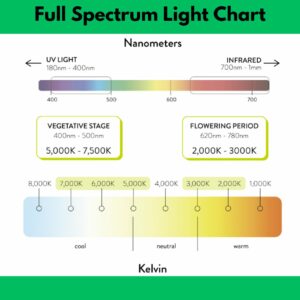
Understanding the Importance of Grow Light Spectrum for Plant Growth
The importance of understanding grow light spectrum for plant growth cannot be overstated. Plants predominantly use light from the blue and red parts of the spectrum for photosynthesis, with each part playing a crucial role. Blue light, which has a wavelength of around 400 to 500 nanometers, is responsible for promoting vegetative growth. This includes leaf and stem growth, and helps the plant photosynthesize more efficiently. Conversely, red light, with a wavelength of approximately 600 to 700 nanometers, is responsible for flowering and fruiting, and encouraging a plant to yield more during its fruiting stage. Understanding these aspects can greatly enhance indoor farming and horticulture efforts. By adjusting the color spectrum of the grow light, one can manipulate plant growth stages and boost yields. This increases efficiency and productivity, reducing costs in the long run. Therefore, comprehending the importance of the grow light spectrum stands pivotal to enhancing the success rate of indoor plant growth.
The Role of Different Light Spectrums in Plant Growth
Different light spectrums play a crucial role in plant growth, substantially influencing the photosynthesis process. For example, blue light, which is part of the visible light spectrum, promotes leaf growth by regulating stomatal opening. Red light, on the other hand, is primarily responsible for the plant’s flowering and fruiting stages. Far-red light affects the seed germination process, whereas green light may act as a signaling factor for specific plant responses and can also enhance plant growth when combined with other light spectrums. In actuality, plants use the varying light spectrums to trigger varied biological reactions, thus optimizing their survival and reproduction.
The impact of light on plants is not limited to the visible light spectrum. Ultraviolet (UV) light, which has a shorter wavelength than visible light, can impact plant growth and development. Low levels of UV can stimulate plant growth, while high levels can have harmful consequences, potentially causing damage to plant tissues and impeding growth. Infrared light, which has a longer wavelength than visible light, affects the flowering and budding of plants. For instance, it influences the photoperiodic response of plants –- a biological response to the changing lengths of day and night. This response plays a crucial role in floral initiation, the process by which plants shift from vegetative to reproductive growth.
Moreover, the direction, intensity, and duration of light exposure are also essential factors influencing plant growth and development. Strong light can enhance plant growth and help them produce more nutritious fruit, but too much light can cause photoinhibition and potentially damage plant tissues. The duration of light exposure, or photoperiod, can regulate the flowering in certain plant species, making it an important factor in indoor and greenhouse cultivation. Light duration changes can signal plants to enter different stages, such as vegetative growth or flowering.
The study and application of light spectrum manipulation in plant growth contribute to a variety of fields, including indoor farming, greenhouse management, and plant breeding. By controlling the light spectrum, scientists and farmers can manage plant growth, stimulate specific plant behaviors, and optimize agricultural yields. The precise use of the varying light spectrums holds promise for revolutionizing agricultural practices and the fields of plant physiology and botany.
Visible Light in the Grow Light Spectrum
Visible light plays a crucial role in the grow light spectrum, also known as photosynthetically active radiation (PAR). This spectrum, ranging from 400 to 700 nanometers, encompasses wavelengths that plants specifically absorb and utilize for photosynthesis. Visible light includes blue and red light, which are particularly beneficial for vegetative growth and flowering stages, respectively. Adequate distribution of visible light is, therefore, essential for optimal plant development.
Introduction to Ultraviolet Light in the Spectrum
Ultraviolet (UV) light is a type of electromagnetic radiation that sits within the light spectrum, between visible light and X-rays. With a wavelength shorter than visible light, but longer than X-rays, it is not visible to the human eye. UV light is categorized into three types; UV-A, UV-B, and UV-C. Despite UV light playing a significant role in the production of vitamin D, excessive exposure can be harmful, leading to skin damage and various eye disorders.
How does the LED Grow Light Spectrum differ?
The Light Emitting Diode (LED) grow light spectrum is distinct from traditional horticultural lighting systems. While conventional grow lights emit a full spectrum of light – which includes unnecessary colors like green and yellow – LED grow lights are specifically engineered to output the optimal wavelengths of light most beneficial for plant growth. These wavelengths primarily fall in the red and blue spectrums. Red light is crucially important in the process of plant photosynthesis, promoting flowering and fruiting. Blue light, on the other hand, is necessary for the healthy growth of leaves and stems. Since LED grow lights emit targeted wavelengths, they are more energy-efficient, facilitating the same plant growth while using less electricity. Manufacturers can also customize LED grow lights, allowing specific control over which color wavelengths to emit and in what proportions. This level of precision enables growers to tailor their lighting system according to the specific needs of their plants, thereby optimizing plant health and productivity.
Advantages and Special Features of LED Grow Lights
LED Grow Lights, produced by a light source, offer multiple advantages and special features like providing the ideal spectrum that sets them apart from traditional lighting systems. One of the major benefits is energy efficiency; they consume less power, saving up to 70% on energy costs. They ensure optimal plant growth by providing a tailored light spectrum suitable for photosynthesis. Additionally, LED grow lights have a longer lifespan – typically 50,000 to 100,000 hours. They also operate at much cooler temperatures, thereby reducing the risk of plant damage. Notably, they are more environmentally friendly, as they contain no toxic materials and are 100% recyclable. Their compact size and flexibility also offer the user a significant degree of positioning freedom.
LED Grow Light Spectrum Vs Traditional Light Source Spectrum
LED grow lights provide a spectrum of light that is specifically designed to support plant growth. Compared to the traditional light source spectrum, LED grow lights offer a broader range of wavelengths, making them more beneficial for various stages of plant growth. LED lights can provide specific light spectrums such as orange light, to enhance photosynthesis and plant flowering, promoting overall healthier growth. Traditional light sources, on the other hand, give off a fixed spectrum of light that cannot be adjusted to suit different plant needs. Additionally, LED grow lights consume less energy and have a longer lifespan, making them more cost-effective and environmentally friendly than traditional light sources.
Red and Blue Light in LED Grow Light Spectrum
The LED Grow Light Spectrum is a revolutionary way to promote plant growth and yield. It employs the use of both red and blue light, offering a diverse light spectrum conducive to plant photosynthesis. Red light, usually in the range of 620-760nm, encourages flowering and fruit production. In contrast, blue light, generally between 430-470nm, fosters the vegetative growth, promoting leaf and stem development. The balanced utilization of both red and blue light in LED Grow Light Spectrum aims to mimic the sunlight’s natural qualities, providing an optimized environment for indoor plants to flourish. Thus, LED Grow Light Spectrum’s integration of these light waves is transforming indoor gardening practices.
Insights on Full Spectrum LED Grow Lights
Full Spectrum LED Grow Lights operate by delivering a full spectrum of light, mimicking natural sunlight, to facilitate growth in plants. These innovative lights are known for their efficiency and durability, offering significant energy savings compared to traditional grow lights. Full Spectrum LED lights cover all stages of plant growth, from germination to flowering, and are suitable for all types of indoor plants and hydroponics. They are designed with a balanced light spectrum, which ensures the health of plants by stimulating photosynthesis and promoting optimal growth and development. Therefore, Full Spectrum LED Grow Lights offer a versatile and effective solution for indoor gardening enthusiasts, improving productivity and plant health.
The Ideal LED Grow Light Spectrum
The ideal LED grow light spectrum significantly impacts the potency, quality, and yield of plant growth. This spectrum provides the essential wavelengths of light that specifically cater to photosynthesis. It typically ranges from 400 to 700 nanometers, encompassing blue (vegging stage) and red (flowering stage) lights primarily. However, other colors like UV, IR, and white also contribute to well-rounded plant growth. High-quality LED grow lights offer a full spectrum, ensuring plants receive the right type of light at the right stage. With the proper spectrum, LED grow lights can effectively mimic the sun, enabling indoor growers to cultivate healthy and productive plants all year round.
How can Growers use the Grow Light Spectrum Chart effectively?
Growers can use the Grow Light Spectrum Chart effectively to optimize the growth and health of their plants. This chart visually illustrates the different wavelengths of light that plants need at various stages of growth, namely, germination, vegetative growth, and flowering. By understanding and applying the information on a Grow Light Spectrum Chart, the growers can choose the right types of grow lights that emit the specific light spectrums required for each stage. For example, blue light, usually strong during spring, is ideal for leaf growth during the vegetative stage, while red light, which is abundant during summer and fall, encourages blooming during the flowering stage. It is also essential to consider the intensity and duration of light exposure, as these factors can significantly impact plant growth and yield. Thus, using a Grow Light Spectrum Chart can assist growers in making informed lighting decisions, leading to efficient indoor farming or controlled environment agriculture.
Using the Grow Light Spectrum Chart for Different Plant Species
The Grow Light Spectrum Chart is a valuable tool for gardeners and cultivators as it serves as a guide to the specific light spectrums needed by different plant species. This chart effectively helps in understanding the essential light requirements for the photosynthesis process in plants. It provides detailed information on the ideal light spectrum, ranging from UV to far-red light, required for optimal growth and health of various plant species. By utilizing this chart, indoor growers can ensure their plants receive the correct type and amount of light necessary for healthy development. The ability to cater to the unique light requirements of different plants dramatically enhances their rate of growth, making the Grow Light Spectrum Chart an indispensable asset for indoor gardening.
Choosing the Right Light Spectrum for Your Indoor Plants
Choosing the right light spectrum for your indoor plants is critical for their survival and growth. Indoor plants use light, specifically spectrum light, to photosynthesize and produce their food, and different light spectra, measured in nm, influence this process crucially. Blue light is beneficial for promoting vegetative growth, while red light is essential for blooming and fruiting. Full-spectrum lights, mimicking the natural sunlight, can be the best solution, providing all the light colors your plants may need. Look out for LED grow lights, particularly advantageous because they’re energy-efficient and can be tuned to emit specific colors from the light spectrum. Ultimately, understanding your plants’ lighting needs can make a significant difference in their health and development.
Expert Tips on Using LED Grow Lights Effectively
Expert tips on using LED grow lights effectively can significantly enhance your indoor gardening experience. Firstly, maintain an optimal distance between your plants and the LED lights; this varies according to the plant species and the light intensity. Secondly, growers use a timer to regulate the on-off light cycles, imitating the natural sunlight patterns to maximize the photosynthetic activity of the plants, thereby enhancing their growth patterns. Thirdly, adjust the color spectrum of your LED lights according to the specific growth phase of the plant, as different wavelengths stimulate various stages of the plant’s life cycle. Lastly, consider the energy consumption and make sure your LED grow lights are energy-efficient, which not only improves plant growth but also reduces utility costs.
Importance of Specific Light Wavelengths for Different Grow Phases
Light wavelengths play a vital role in the development of plants in different growth phases. For seed germination and initial growth, plants absorb blue light (around 400-500nm wavelength) to boost vegetative growth of leaves and stems. As they approach the flowering and fruiting stage, plants require more red light (around 600-700nm wavelength), aiding in photosynthesis and driving their maturation. Certain crops even utilize far-red light (700-750nm) to regulate shade avoidance responses and flowering time. Hence, by manipulating the light spectrum, farmers and researchers can guide the growth, yield, and quality of crops, making the understanding and application of specific light wavelengths crucial in modern agriculture.
Understanding Short-Day Plants and Light Spectrum
Short-day plants are unique in their growth patterns, particularly regarding their response to light spectrum and day length. These plants predominantly flower when the daylight period is less than a specific duration, usually around twelve hours. Plants respond to light based on a photoperiod mechanism that involves the plant’s recognition of the light spectrum, particularly red and far-red light, for chlorophyll absorption. By detecting the ratio between red and far-red light, short-day plants ascertain whether the sun is setting or not. Understanding this incredible mechanism not only provides insight into the adaptive strategies of these plants but can also contribute significantly to improving agricultural productivity by making farmers more equipped in adjusting light periods and wavelengths, to optimally nurture these crops.
Final Thoughts on LED Light Spectrum Considerations
After extensive review and understanding of LED light spectrum considerations, it can be concluded that the choice of LED light largely depends on the specific application and requirements. Whether it’s for promoting plant growth in horticulture, creating mood lighting in a residential setting, or ensuring visibility in industrial applications, the LED light spectrum plays a pivotal role. The blue-to-red ratio, CRI, and color temperature are crucial parameters that determine the effectiveness of LED lights in different applications. The benefit of energy efficiency and long lifespan further add to the appeal of LED lights. While selecting LED lights, balancing between these spectrum considerations ensures optimum performance. In conclusion, a deep understanding of the LED light spectrum is indispensable in making informed decisions and achieving desired results.
Optimal Distance for 600W LED Grow Lights from Plants
Understanding the Basics of LED Grow Lights
Growing plants indoors requires careful consideration of several factors, not the least of which is the proper use of artificial lighting. LED grow lights have revolutionized indoor gardening by providing a more energy-efficient and longer-lasting solution compared to traditional lighting methods. When discussing a 600W LED grow light, it’s important to understand that these lights serve as a replicate of natural sunlight, providing the full spectrum of light necessary for photosynthesis. However, one crucial aspect to consider is the optimal distance between these lights and the plants to maximize growth without causing damage.
The Importance of Correct Distance
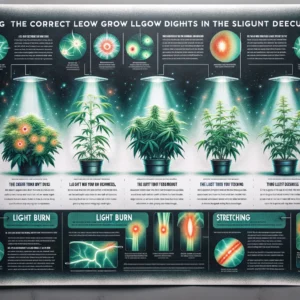
The distance of your 600W LED grow light from your plants can significantly impact their health and growth. If the light is too close, it can lead to light burn, causing the leaves to bleach and the plants to suffer. Conversely, if the light is too far away, plants may stretch towards the light source, leading to weak structural development and suboptimal growth. Additionally, incorrect spacing may result in one area receiving too much light while another gets too little, leading to an uneven growth pattern.
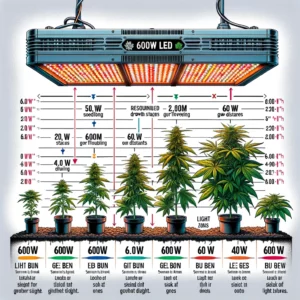
General Distance Guidelines
For a 600W LED grow light, a general rule of thumb is to maintain a distance of approximately 18 to 24 inches from the top of the plant canopy during the vegetative phase of growth. This range ensures that plants receive ample light without the risk of heat damage. During the flowering stage, you might need to adjust the distance to 16 to 22 inches, as many plants require more intense light during bloom. However, these recommendations are not set in stone; different plants have variable light needs, and it’s important to monitor your garden and respond to how your plants react to the lighting.
Adjusting for Plant Growth Stage
During the initial seedling or clone stage, your plants will not require as much light intensity. At this stage, it’s generally safe to place the 600W light around 24 to 30 inches away from the plants. This distance helps promote strong, healthy stems without overwhelming the young plants with intense light. After the seedlings have established and as you transition into the vegetative stage, you can gradually lower the light to fall within the 18 to 24-inch range.
Observing Plant Response
One of the best ways to determine the optimal distance for your grow lights is by observing your plants closely. Signs of light stress include yellowing or curling leaves, and a stretched appearance could indicate insufficient lighting. By adjusting the light’s height in small increments and monitoring the plants’ response, you can find the ideal balance that encourages vigorous growth. Some growers employ the hand test, where they place their hand at canopy level; if the light feels uncomfortably hot after a few moments, it’s likely too hot for the plants as well.
Fine-Tuning with Advanced Tools
To get more precise with your lighting distance, you can use tools such as a lux meter or quantum flux meter to measure how much light reaches your plants. With these devices, you can adjust height to achieve optimal light intensity, usually measured in PPFD (photosynthetic photon flux density). Although these tools represent an additional investment, they can take the guesswork out of finding the correct distance and light intensity for your specific 600W LED grow light setup.
Conclusion
The quest for the optimal distance when using a 600W LED grow light from plants requires a combination of understanding general guidelines, observing plant behavior, and potentially using advanced measurement tools. It’s also vital to remember that individual plant species may have unique requirements, and environmental factors such as humidity and temperature also play a role. By paying close attention to your plants and responding to their needs, you can find the sweet spot that ensures healthy growth and bountiful yields under your LED grow lights.
Optimizing Light Intensity for Thriving Microgreens
Understanding the Importance of Light in Microgreen Growth
Light is a critical factor that plays a vital role in the process of photosynthesis, which is essential for the growth and development of plants. Microgreens, the young seedlings of vegetables and herbs, require an optimal light intensity to thrive. Insufficient or excessive light can hinder their growth or cause damage to these delicate plants. Therefore, understanding how to manage and optimize light intensity is crucial for cultivating healthy and robust microgreens.
Choosing the Right Light Source
One of the first steps in optimizing light intensity for microgreens is selecting an appropriate light source. Natural sunlight is the most balanced spectrum for plant growth but not always available or consistent, especially for indoor gardening. In such cases, artificial lighting like fluorescent bulbs, LEDs, or grow lights can be a suitable alternative. LEDs are increasingly popular due to their energy efficiency and the ability to tailor spectrums for plant growth. It is important to research and invest in quality lighting systems that can mimic the full spectrum of sunlight to a certain extent.
Determining Optimal Light Intensity
Microgreens have specific light intensity needs which can vary according to their species. Generally, light intensity is measured in units of micromoles per square meter per second (µmol/m²/s). For most microgreens, a light intensity of 100 to 200 µmol/m²/s is adequate for proper growth. This can be monitored using a light meter to ensure the plants are receiving sufficient light without being overexposed. Adjusting the distance between the light source and the plants is one common way to control the intensity reaching the microgreens.
Creating an Ideal Light Schedule
Besides intensity, the duration of light exposure also significantly impacts microgreen growth. A light schedule, or photoperiod, should replicate the natural cycle of day and night to some extent. Typically, microgreens flourish under a photoperiod of 12–16 hours of light per day, followed by 8–12 hours of darkness. This rhythm supports healthy growth and can be achieved using an automatic timer to switch lights on and off at set intervals to ensure consistency.
Monitoring and Adjusting for Growth Stages
As microgreens progress through different stages of growth, their light requirements may change. During the germination stage, seeds often require darkness or very low light intensity to trigger growth. Once the seeds have sprouted, they should be exposed to the optimal light intensity recommended for their species. Vigilant monitoring and adjustment of lighting will ensure that the microgreens develop strong stems and vibrant leaves. It’s also essential to observe the plants for any signs of stress or burning, indicating the need to adjust light intensity or duration.
Balancing Heat and Light
Artificial lighting sources can emit heat, which can negatively impact microgreens if not appropriately managed. Excessive heat can lead to dehydration, nutrient deficiencies, or even death of the plants. To prevent such issues, it’s essential to balance light intensity with ambient temperature. LED lights are known for producing less heat compared to other artificial sources, making them a preferred choice when heat management is necessary.
Conclusion
Optimizing light intensity plays a pivotal role in yielding a successful microgreen harvest. By choosing the right light source, determining the optimal light intensity, creating an ideal light schedule, and adjusting for various growth stages, you can cultivate healthy and vibrant microgreens. Balancing heat and light is also a crucial component of maintaining an ideal growth environment. Careful attention to these details will not only facilitate the flourishing of microgreens but will also produce a crop rich in flavor, nutrition, and visual appeal.